
So far, I am only working one day and that was the only one they had available for me closest to where I live. :(
Today's post was inspired by Freshly Given's wool pants to shorts tutorial that I had pinned on Pinterest long long ago. In my recent thrift shopping extravaganza, I picked up a pair of wool, grey-ish XOXO dress pants. They were very cute, but unfortunately had some awful stains all over it. Luckily, they now have a new life as wool shorts!

I used Freshly Given's tutorial as a vague guideline to make mine. I'll be going a little more in-depth on how to measure for the cuffs and even show you how to make belt loops!
Let's begin!
Take your pants and put them on. Mark where you want the actual length to be. Lay them flat on the floor and measure from the top of the pants to where the mark is. Mine is 12.5 inches from top of pants to the mark.
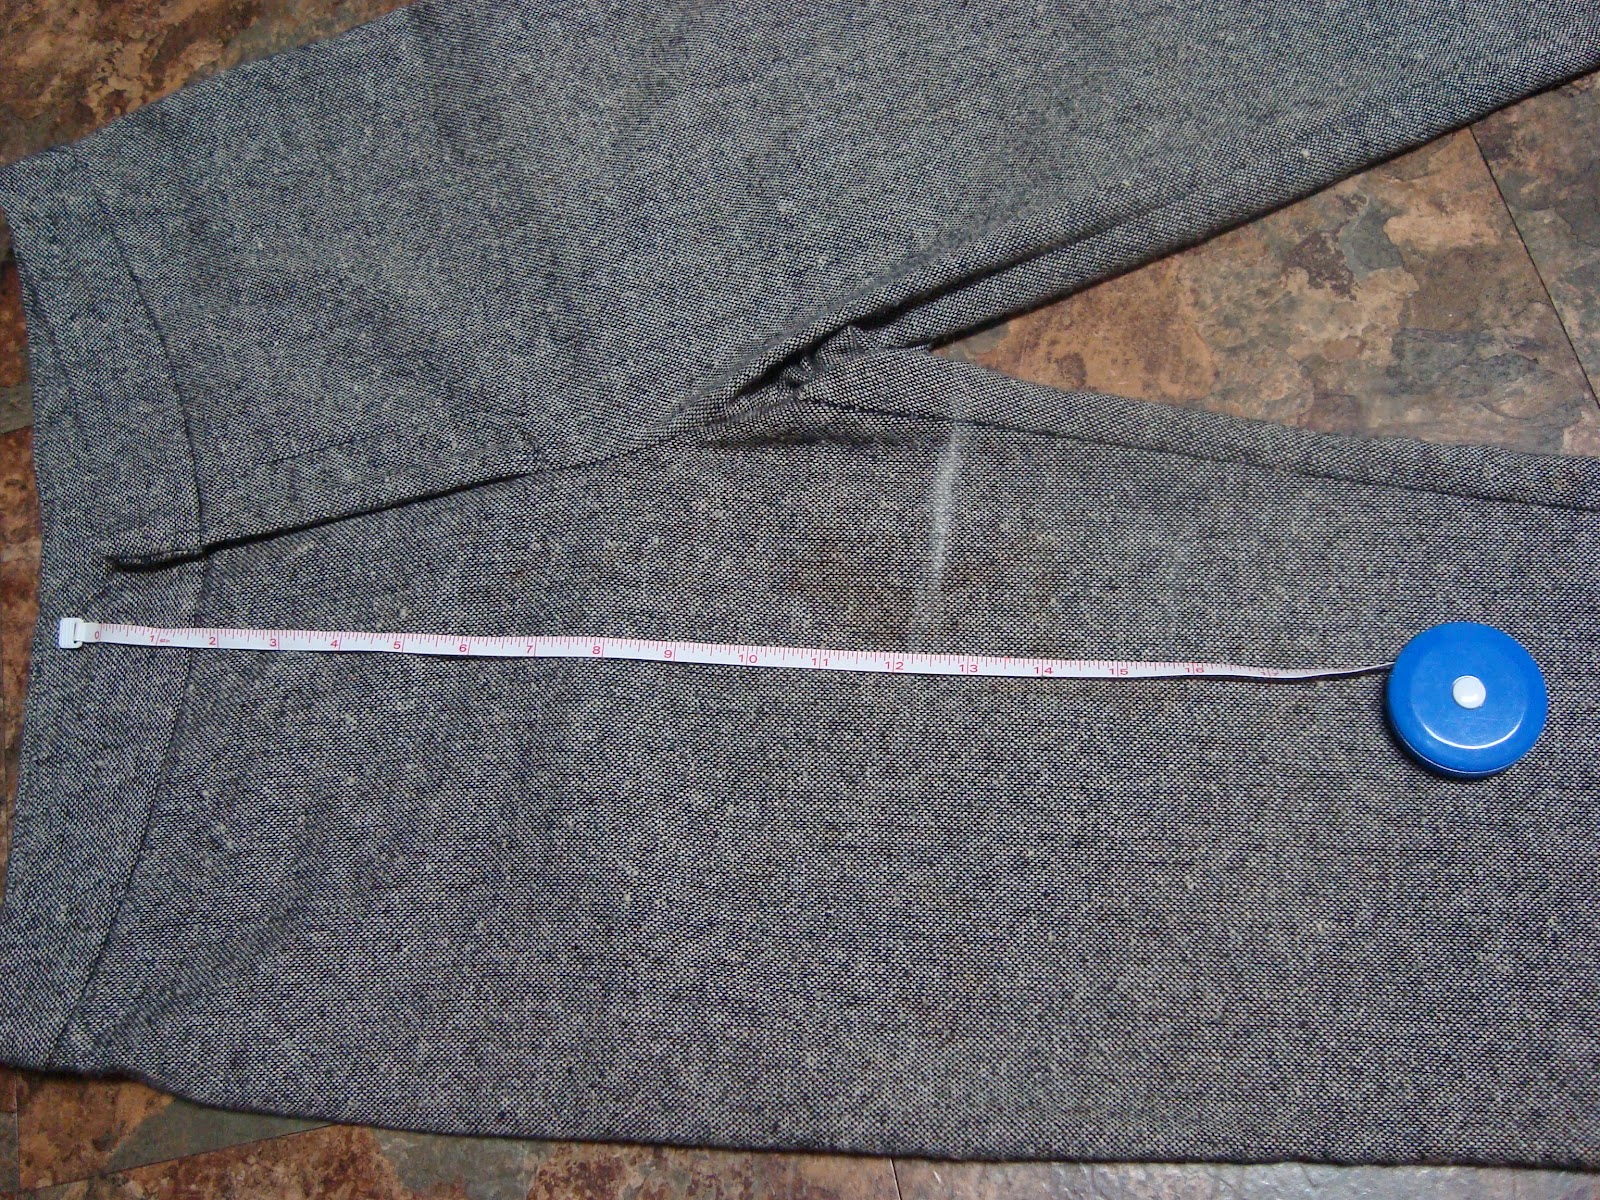
Take that measurement and measure and mark for the other leg.

Now that we have marked that, you want to figure out how big of a fold-over cuff you want. I wanted the width of my cuff to be 1.5 inches and in Freshly Given's tutorial, she folded her cuff twice. I also wanted the double fold effect so I doubled 1.5 to get 3 inches. Mark 3 inches down from your original line.

Cut carefully along the bottom line.

Now turn your pants inside out. We're going to get ready to make the cuffs!

Head on over to your ironing board. I tried to fold my cuffs up like Freshly Given but the fabric of my pants were very loosely woven and frayed like nobody's business. So, I decided to properly hem them. First, I folded up about 0.25 inch and ironed it flat.

Next, I folded it again so that the fold was 1.5 inches. Iron it down so that it lies flat and makes it easier to sew.

Head on over to your sewing machine and sew the hem on both legs.

Looking good! You can stop here if you want a normal hem on your shorts. If you want to create a cuff you can fold it up like in my photo and you'd be done, but I'm going to show you how to tack the cuff in place so that it stays folded FOREVER. (Okay, exaggeration....)

Take your pants back to the sewing machine and sew on the outer and inner seams on the folded cuff so that the cuff stays folded up. You can also hand sew this. My machine had a small seizure while attempting this so I switched to hand sewing. I also did some small invisible stitches on the middle front and back of each leg to provide further fold-iness. :)

Now all the cute, fashionable girls at Chictopia, wear their wool shorts with a cute thin belt. I also want to wear mine with a belt, but my pants has no belt loops. If your pants also don't have belt loops, I'll show you how to make and add belt loops to yours! It's super easy.... if you have a sewing machine.
Take some scrap fabric from the legs you cut off earlier.

I got my measurements for belt loops from other pants I had in my closet. I wanted my loops to be 0.5 inch wide so I doubled that to 1 inch. Measure from the top of your pants to about 0.25 inch past the waistband and you get your length for your loops. Mine were 2 inches long but I added 0.5 inches for seam allowance. Mark and measure on your scrap fabric and cut out.


Sew down the open/raw side on all pieces. You're basically making tiny tubes.


Iron the tubes flat. I chose to top stitch both edges (long sides) of the tubes to help them lie flat and to add an extra fancy touch.

Now mark on your pants where you want to attach your loops. I found the middle of the pants and measured the halfway point in between the middle seam and the edge of the pants. Take one of your loops and fold one of the ends over very slightly and position over where you marked on your pants. I used a small zig-zag stitch and slowly sewed through the thick layers of fabric.
Do the same for the bottom of the loop: fold the end over slightly and then sew it down. Should look like this when you're done.

Do that with the rest of your loops and TADAA! You're done! Show off you newly upcycled shorts and patiently wait for cooler weather to arrive to wear them!!!!!

Super cute shorts. So crafty, as always.
ReplyDeleteWhat's the new job? Congrats!!
Is that THE Marianna I know from OCH????
DeleteI'm going to be giving flu shots at various retail places for Mollen Immunizations! So far, it seems to be only one retail place... :(
I miss you!
Yup yup! I'm a little slow on the reply but I'm a faithful follower of your blog. I have to have some way to keep up with my envy of your craft-ability!
DeleteMaybe closer to flu season "business" will pick up! lol
Miss your smiling face at tha OCH bunches!
Oh you rocked this tutorial! Very nice indeed.
ReplyDeleteThank you for the shoutout.
Thank you so much and you're welcome! I love your blog so much! You have great tutorials and the cutest clothes. :)
Delete